TeamCity integration
The rl-secure CLI tool integrates with TeamCity to provide automated software security scans for all your CI/CD builds.
The integration relies on the official rl-scanner Docker image which is used to install and run the Spectra Assure CLI, scan build artifacts, and generate analysis reports.
TeamCity displays analysis results for every scanned artifact, and can be configured to show the full SAFE report (rl-html).
In this guide, you will learn how to integrate rl-secure into an existing TeamCity setup using the graphical user interface.
The guide covers a basic scan-only workflow for analyzing build artifacts with rl-secure and displaying analysis reports on TeamCity.
The guide expects that you already have at least one TeamCity project configured, and that the project is able to produce build artifacts for rl-secure to scan.
The instructions in this guide have been tested only with TeamCity On-Premises.
If you're not a TeamCity administrator or an experienced user, we strongly recommend you learn at least the basics of TeamCity before proceeding with this guide.
Throughout this guide, we'll refer to the official TeamCity documentation for additional context and details.
TeamCity integration workflow overview
- TeamCity retrieves the artifact generated by the software package build configuration.
- The software package artifact is saved into a temporary directory on TeamCity.
- A new build configuration is added to the project to scan the software package and generate reports. A valid
rl-securelicense is saved to the build configuration. - The temporary directory with the software package is mounted into a Docker container, and
rl-secureruns inside the container to scan it. - When the scan is complete, the container automatically shuts down. Generated reports are stored on TeamCity and can be downloaded.
- The full SAFE report is displayed in a tab on the TeamCity build page.
Prerequisites
To successfully integrate rl-secure with TeamCity, you need:
A working TeamCity server installation with at least one build agent configured. Docker must be installed on the build agent(s) to allow using the
rl-scannerDocker image. Check with your TeamCity administrator if this is already set up.Access to the TeamCity graphical user interface and an account with permissions to create and modify build configurations. Depending on your organization policy, you might have different permissions in different TeamCity projects. Contact your TeamCity administrator for help if you can't access a project you need to work with.
A TeamCity project that produces build artifacts and publishes them on the TeamCity server after the build is done. You can use an existing project or create a new one.
A valid rl-secure license with site key. You must convert your license file into a Base64-encoded string for this integration. If you don't already have a site-wide deployment license, follow the instructions in the licensing guide to get it from ReversingLabs.
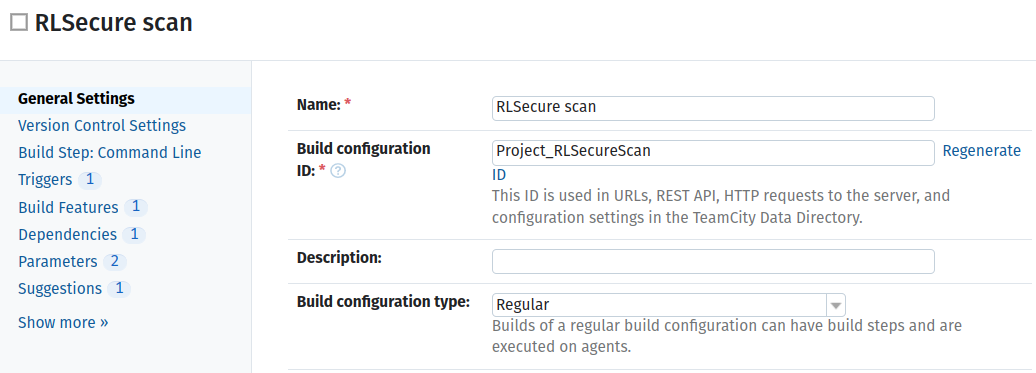
1. Set up a TeamCity build configuration
In this step, we're creating a new TeamCity build configuration that will use rl-secure to scan build artifacts generated by another build configuration.
In the context of TeamCity, a build configuration is essentially a set of instructions that tells TeamCity how to build your project. Every TeamCity project can have multiple build configurations that usually correspond to different types of builds (nightly, staging, production...) or different steps in the CI/CD process (testing, security scanning, release...).
In this example, we're using a previously created project with an existing build configuration that produces build artifacts.
In your web browser, access the TeamCity UI and select the project you want to modify.
In General Settings > Build Configurations for the project, select Create build configuration. Create a new build configuration manually, with the build configuration type set to Regular.
After the initial setup, access the settings page for your new build configuration. In the next sections of this guide, you will modify some of those settings to complete the integration.
2. Add rl-secure license keys as environment variables
In this step, we're making sure the newly created build configuration can use the rl-secure license required for the integration.
This is done by mapping the license site key and Base64-encoded license file to environment variables in the build configuration parameters.
On the General Settings page of your new build configuration, select Parameters.
Use the Add new parameter button to add the following two environment variables:
RLSECURE_SITE_KEYRLSECURE_ENCODED_LICENSE
and set their configuration details as shown in the following table:
| Name | Kind | Value | Spec |
|---|---|---|---|
env.RLSECURE_SITE_KEY | Environment variable (env.) | Copy and paste the site key string you received with your rl-secure license | Label: RLSecure site key Display: Hidden Type: Password |
env.RLSECURE_ENCODED_LICENSE | Environment variable (env.) | Copy and paste the string you get when you Base64-encode your license file | Label: RLSecure license key Display: Hidden Type: Password |
- After saving changes to the new parameters, they should be listed in the Environment Variables (env.) section on the page.

3. Collect build artifacts
In this step, we're making sure the newly created build configuration can access build artifacts from another build configuration in the project. This is done by adding the build artifacts as dependencies to our new build configuration.
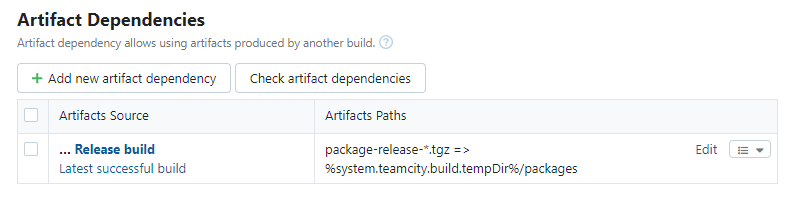
From the General Settings page of your new build configuration, select Dependencies > Add new artifact dependency.
In the dialog that opens, set the configuration details as follows:
Depend on - Select an existing build configuration from which you want to scan build artifacts
Get artifacts from - Latest successful build
Artifacts rules -
package-release-*.tgz => %system.teamcity.build.tempDir%/packages
This rule instructs TeamCity to copy build artifacts into a temporary directory.
The first part of the artifact rule (package-release-<version>.tgz) must correspond to the filename pattern of the artifacts generated by the build configuration you selected under Depend on.
You may need to adjust this pattern for your use case - the example we're using here is only illustrative.
The second part of the rule (system.teamcity.build.tempDir) is the temporary directory that TeamCity will use to store build artifacts.
This directory will later be mounted inside the Docker container so that the build artifacts can be scanned.
- Clean destination paths before downloading artifacts - Leave blank (unchecked).
- After saving changes in the dialog, the new dependency should be listed in the Artifact Dependencies section on the page.
4. Connect rl-secure Docker image to TeamCity
In this step, we're defining how the rl-secure scan will be executed.
This is done by adding a build step to our new build configuration and instructing TeamCity to perform the scan in a Docker container.
We're pulling the official reversinglabs/rl-scanner Docker image which includes a command-line tool called rl-scan.
To run the tool in the container, we have to specify which package(s) to scan and where to store the analysis reports.
This information is provided to the tool as command-line parameters.
We're also adding the command-line option --message-reporter=teamcity to make sure the output of the rl-scan tool complies with the TeamCity Service Message format.
This step requires the Docker integration on your TeamCity installation. Consult your TeamCity administrator if you can't access Docker-related options in the build configuration dialogs.
From the General Settings page of your new build configuration, select Build Steps > Add build step.
Select Command Line as the runner type. In the dialog that opens, set the configuration details as follows:
Step name - Scan package
Run - Executable with parameters
Command executable -
rl-scanCommand parameters -
--package-path=%system.teamcity.build.tempDir%/packages/package-release-*.tgz --report-path=%system.teamcity.build.tempDir%/reports --message-reporter=teamcityDocker Settings
Run step within Docker container -
reversinglabs/rl-scannerDocker image platform - Linux
Pull image explicitly - Select checkbox "If enabled,
docker pull <imageName>will be run beforedocker runcommand"
- Save changes to finish adding the build step.
5. Save analysis reports
Analysis reports generated by rl-secure are essentially build artifacts of our new build configuration.
In this step, we're making sure to collect and save them for future use.
On the General Settings page of your new build configuration, find the Artifact paths configuration field.
Set the following as the artifact path:
%system.teamcity.build.tempDir%/reports/** => rl-secure-report.zip
This will compress all reports generated by rl-secure into a single ZIP file.
- Save changes to the build configuration settings.
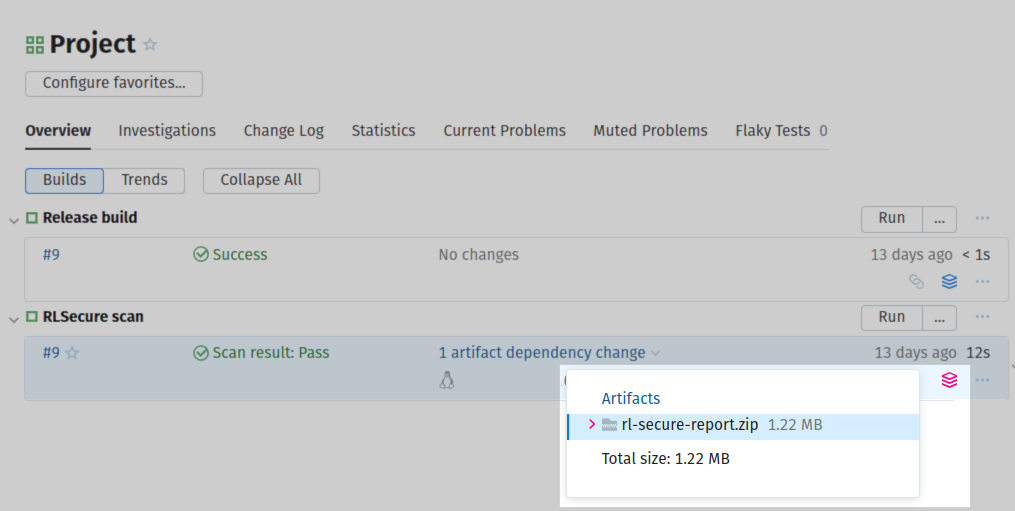
With the artifact path configured, you'll be able to download the reports for every build directly in the TeamCity interface. Artifacts can be downloaded from the Project Home page, from the Build Configuration Home page, or from individual Build Results pages.
6. Trigger the scan automatically
In this step, we're automating the scan so that it runs as soon as the packages we configured as dependencies in Step 3 are built. This is done by adding a build trigger to our new build configuration.
If you skip this step, you will have to trigger the scan manually.
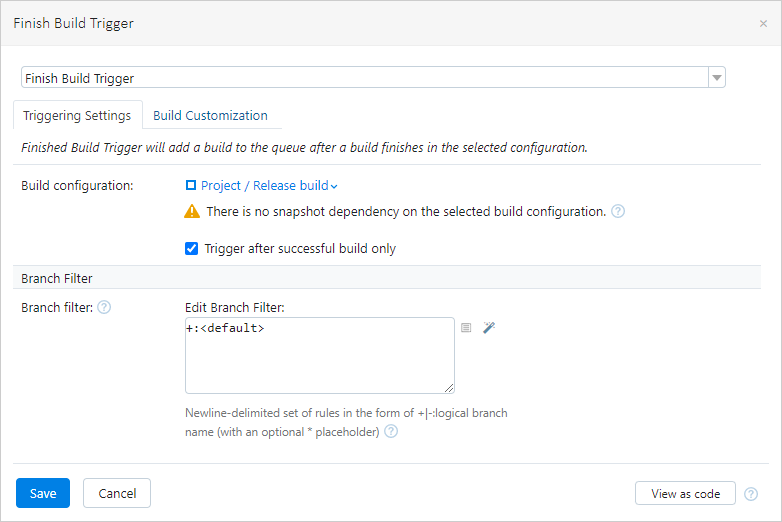
On the General Settings page of your new build configuration, select Triggers > Add new trigger.
Choose Finish Build Trigger as the trigger type.
In the Triggering Settings tab, select the checkbox Trigger after successful build only.
Save changes to add the build trigger.
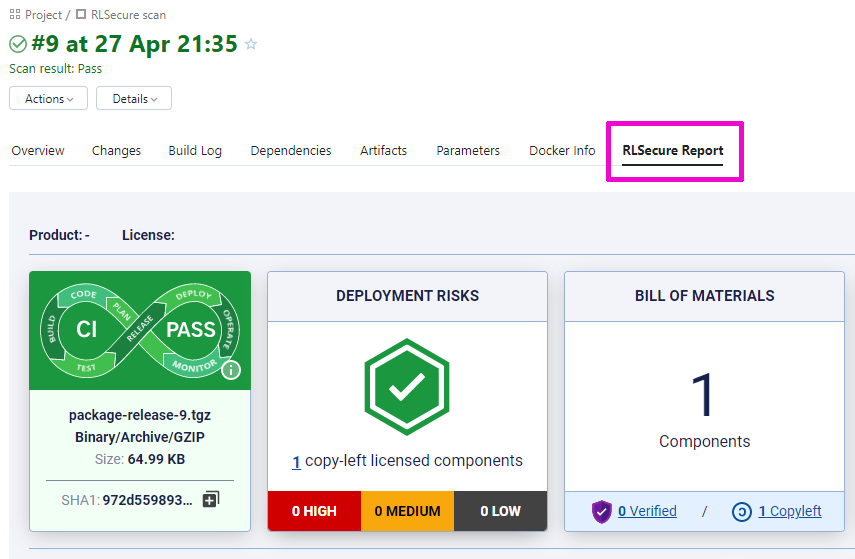
7. Display the SAFE report in TeamCity
The final step is to embed the SAFE report (rl-html format) into our TeamCity project page so that everyone with access to the project can conveniently preview the report for every build.
This is done with the Report feature of TeamCity that allows us to add our SAFE report as a custom tab on the Build Results page.
Access the settings page of the project where you created your new build configuration.
Select Report Tabs > Create new build report tab.
In the Edit Report Tab Settings dialog that opens, set the configuration details as follows:
Tab Title - RLSecure Report (or any other custom name)
Start page -
rl-secure-report.zip!rl-html/sdlc.html
- Save changes to finish adding the report tab.
To confirm that everything is successfully configured, check the Build Results page after the next scan. It should contain the custom tab with the SAFE report as illustrated in the following image.
You have successfully configured your first rl-secure TeamCity integration.
Next, you can try integrating rl-secure into more complex projects and pipelines.